We had been idly considering getting a 3D printer for a year or so. We had seen presentations at the local radio club, demonstrations at local maker-spaces, and were keeping an eye on the technology. It was clear that good quality entry-level printers were dropping in price and it was nearly time to get on board. In late 2018 Mark started bringing home things he had designed and 3D-printed at school, so in Dec 2018, we decided to get our first 3D Printer for Christmas. In Dec 2019, we wanted to share the most important lessons we have learned in our first year, and a few tips and tricks.
Our 3D printer is a Creality Ender 3, bought from Amazon during a sale when it was approx $200, but we have printed objects which are the envy of friends with $3000+ 3D printers. Since buying it, we have upgraded our 3D printer with a few printed add-ons, and a few purchased add-ons, more details below.
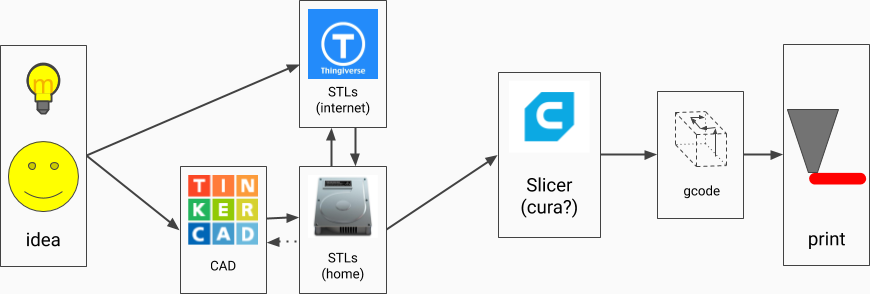
If you want to design your own parts, probably start with Tinkercad which is a simple easy web-based Computer-Aided Design package. Follow the built-in tutorials, drag boxes, cylinders, cones around, punch holes through them, assemble simple parts.
If you wish to upgrade to a more feature-rich CAD package, Fusion 360 is currently still free for hobbyist use BUT somewhat criticised for being able to "hold all your files to ransom" if they decide to charge (you personally, or everyone) at a later date
FreeCAD is a completely free and open-source 3D CAD program. We have not used it ourselves but it has been recommended.
OpenSCAD is interesting if you're a programmer and would like to program your designs like functions with parameters, rather than drag/drop them. OpenJSCAD is similar but JavaScript / web-based. ImplicitCAD is similar but uses a different language.
"Export STL" once you are done. Possibly share on Thingiverse, speaking of which...
Far easier, there are many online libraries where people have already shared their creations for free, or others at quite reasonable prices. If you need any replacement plastic part, silly toy, box/case for parts for one of your other hobbies, figurine, or gizmo, first search to see if someone has already published one, because there's a really good chance they have:
Having designed or searched for your chosen part, you'll download an STL file. This describes the entire part, not in cubes/cylinders/cones/etc but as a series of triangles making up faces surrounding solids.
You'll feed your STL file to a slicer. A slicer is somewhat like a printer driver, but 3D rather than 2D, and instead of just converting an image into a series of ink jets, it needs to be able to lay down thin layers of plastic whilst ensuring the thing you want has nice outside layers ("skin" or "shells"), nice filling ("infill") because solid models are a waste of plastic and weight and actually make quite a mess as they have nowhere to "overflow". The slicer also makes sure higher layers are supported by lower layers even if overhanging parts require printing extra "supports" - these are extra (fairly thin) structures which can be snapped off and discarded once the print is finished.
We use the free Cura software for slicing. Slic3r is another popular free open-source slicer. Simplify3D is a popular commercial offering.
You will typically import an STL file, scale/rotate/place it appropriately, choose print quality (mostly layer height) and infill/support settings etc, "generate gcode", and examine in the "preview" pane, to see if each layer looks sensible or if you'd rather manually tweak some settings before saving the gcode file.
The output of your slicer is "gcode", which is a series of X/Y/Z/Extruder movements and some other commands to control temperature, display messages etc. This will be printer-specific, and will depend on all your chosen settings (filament type, layer height, number of skins, infill type and density, bed adhesion, there are hundreds of settings), which is why you almost never see gcode distributed, and need to do the STL to gcode slicing operation yourself.
We save the gcode to a microSD card, to take to the printer. We intend to later experiment with OctoPrint / OctoPi which acts as a network print server / print queue for your 3D printer.
The last step in the process is the printing itself. The Ender 3 uses Fused Filament Fabrication (FFF) or Fused Deposition Modelling (FDM). The 3D printer pulls some filament from the spool and melts it in the print head / hot end. Then it lays it on the print bed or the previous layer, and cools it with a part fan to set the deposited plastic. "Cartesian" printers have X/Y/Z axes, the Ender 3's start at 0,0,0 in the front bottom left corner. Other Cartesian printers may have 0,0,0 in other corners or even in the middle. There are delta, polar and other non-cartesian printers with a different layout of steppers, belts, arms. There are also other 3D printers that use completely different processes, such as SLA / DLP where light beams cause selected parts of a resin to set, SLS where a laser melts layers of fine dust (often metal) into the model shape, and various others.
A wide variety of materials can be used in 3D printing. We almost exclusively use PLA, which is easy to work with, available in a wide variety of colours and textures, and vegetable-based, which also means (slowly) biodegradable when disposed of, our parts are not going to pollute oceans or landfill for hundreds of years. ABS is another popular plastic, more suited for automotive / hard-wearing parts that need to be more rugged and able to withstand harsher conditions. Several other plastics are supported on the Ender 3. Modifications are available to print in chocolate! Other types of printers can print candy, metal, or even concrete.
The most important things we have learned during our first year:
When the warning sign says "do not touch the heated bed", this isn't really to protect you from burns, as it's only typically around 50C, which is hot, but not realistically hot enough to burn skin. Mostly "do not touch" is to protect the bed - humans are naturally oily greasy creatures, and if you touch the bed you will leave fingerprints on it, even if you have fairly recently washed your hands and not eaten greasy burgers and chips since. The PLA filament then doesn't stick properly to those areas, your prints lift or curl off the bed, and/or your first layer just tangles and never stays in the right place. I've seen pictures in the facebook groups where people have complained about their first layer not sticking, and it is really obvious from the pictures that they have a small child who has left an almost perfect hand-print right in the middle of the bed.
If you do (inevitably) touch the bed, unclip / remove the printing surface and wash with dish soap and warm water, dry with a clean lint-free cloth or just by evaporation, and then NO TOUCHING! If possible, keep the bed covered when not in use, to keep dust, pets, children or even yourself from touching the surface.
The hot end / nozzle, on the other hand, is VERY HOT, typically 200C shortly before / during / after use, and you WILL remember the first time you touch that - best avoided.
When building the printer, carefully follow the assembly instructions, and/or any of the construction videos on youtube. Be sure to tighten all the nuts and bolts and belts securely but don't over-tighten and damage anything:
In order to avoid filament tangles, the end of the filament should only ever be in one of three places:
Never let go of the end, never allow it to unspool everywhere. Thomas Sanladerer explains why and 4 other ways to ruin your filament.
It is important to learn how to "level the bed". The term "levelling" here is actually somewhat misleading. It does not need to be horizontal. People levelling by using spirit-levels for a perfectly horizontal bed have missed the point, in fact there's nothing stopping you printing at (say) 45 degrees if the model has the correct supports, or certainly 5-10 degrees off-horizontal would be no problem at all. No, what really matters is that it is aligned with the X and Y axes, such that the head is slightly above any part of the bed when Z=0. The easiest way to do this is to have the printer auto-home (to X=0,Y=0,Z=0), then move the head (don't drag it by hand, use the menus to "prepare", "move axis" to move X and Y, or better still, some pre-prepared gcode (see below) to move above each height adjustment knob in turn. You should then be able to take a thin bit of paper (EG a till receipt, or sheet of thin "letter" paper) and just slide it between the nozzle and the bed.
Adjust each corner in turn. If you moved any knob more than about a turn, make sure to re-visit the other corners. Once levelled properly the first time, you probably require less than a quarter turn adjustment any time you have removed/replaced the bed, and once you have the hang of it, the entire process needn't take longer than about 20 seconds.
We like printing on a mirror tile. Mirrors are flat, by definition, otherwise people complain about lousy reflections. This means once you have all 4 corners aligned (or technically 3, but do all 4 as above anyway), the whole of the rest of the bed must be well aligned with Z=0, there should be no hills, valleys, pits, or raised areas. We bought a pack of 5 or 6 cheap mirror tiles (Home Depot, Lowes, or other home hardware store of your choice), a diamond glass-cutter, and made 2 straight cuts and breaks to fit the size of the bed. That said, if you really like the supplied bed, and can remove prints easily, and keep it nice and clean, good for you, stick with it.
Hair spray. We got a big, cheap can of any brand hair spray, no "dry shampoos", definitely no oils, just super / uber / mega / ultra / maximum HOLD, as much HOLD as you can get for a few bucks. This provides a good "stick" for the all-important first layer, yet releases the parts nicely once the bed cools. Probably mostly, though, it covers up your greasy fingerprints! 😜 After washing the above mirror tile with soap and water, we "wet" the entire bed with a coating of hair spray and give it time to dry. After a few more prints, a quick light spray refreshes the surface. If it's starting to get a bit messy after a few dozen prints, or if you are struggling to remove a part, you can wash the hair spray off with soap and water and start again.
"Silent board" - we managed to get the official Creality "silent upgrade board" at a substantially reduced price. This seems to make very little difference to print quality, but does remove the "singing of the steppers" and makes the printer substantially quieter, such that the fans are easily the noisiest part of the printer now. Now that said, if you like the "singing of the steppers", save your money, there's no noticeable quality improvement as far as we can tell.
Apart from the mirror and the hair spray, do not go crazy with unnecessary upgrades. Again, this $200-$300 printer can easily beat many $3000 printers without extra upgrades.
Many upgrades, you can print yourself, for example:
######################################################################
2019-01-21  KeyRingPam.stl
            033-KeyRingPam.gcode (18m, 0.2mm, 75% gyroid)
######################################################################
2019-02-01  FullPlate.stl
            keychainGear1.stl
	    pins-fixed_hrt_key.stl
	    038-MicroGearFeb14.gcode (2h23m, 0.2mm, 20% gyroid)
######################################################################
            pins-fixed_hrt_key.stl
	    039-pins-fixed_hrt_key.gcode (12m, 0.2mm, 20% gyroid)
######################################################################